Upgrade Your Shaft Alignment Tool Today with Acoem's AT-Series Trade-In Program! Click Here to Learn More About This Limited Time Offer

/
/
AT-300

Shaft Alignment System

AT-300

Next-Gen Digital Line Laser System,
Engineered for Exceptional Performance

Boost your potential with the Acoem AT-300, featuring precision line laser sensors and an extensive lineup of programs for shaft alignment.

Acoem AT-300

The AT-300’s seamless integration of connectivity, mobile devices, and apps empowers maintenance professionals to swiftly respond to machine failures and take corrective actions regardless of their location.

Utilizing the newest and latest CCD technology, the smart sensors deliver superior measurement performance, ensuring precise alignment and optimal operational efficiency. This advanced tool streamlines maintenance processes, minimizing downtime and maximizing productivity. 

Smart Alignment Sensors

Multiple Measurement Methods

With the AT-300, you can measure misalignment with five different measurement methods. Each method includes benefits for different types of machinery.

MULTIPOINT

The Multipoint method enables you to record measurements from multiple points from any position on the rotation.

TRIPOINT

With the Tripoint method, the alignment condition can be calculated by recording three points while rotating the shaft at least 60°.

GuideU™ Interface

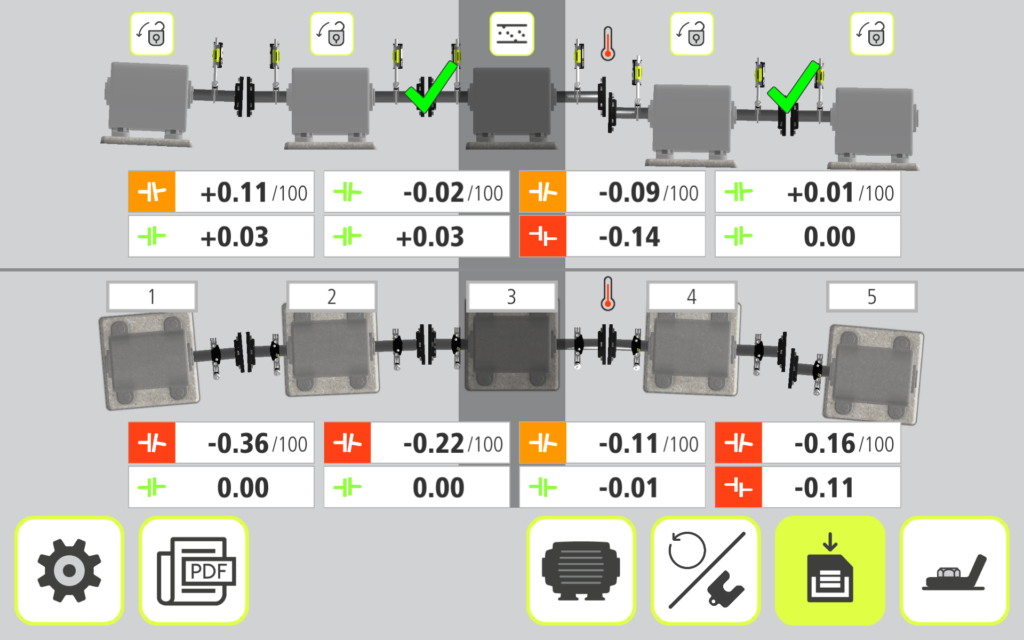
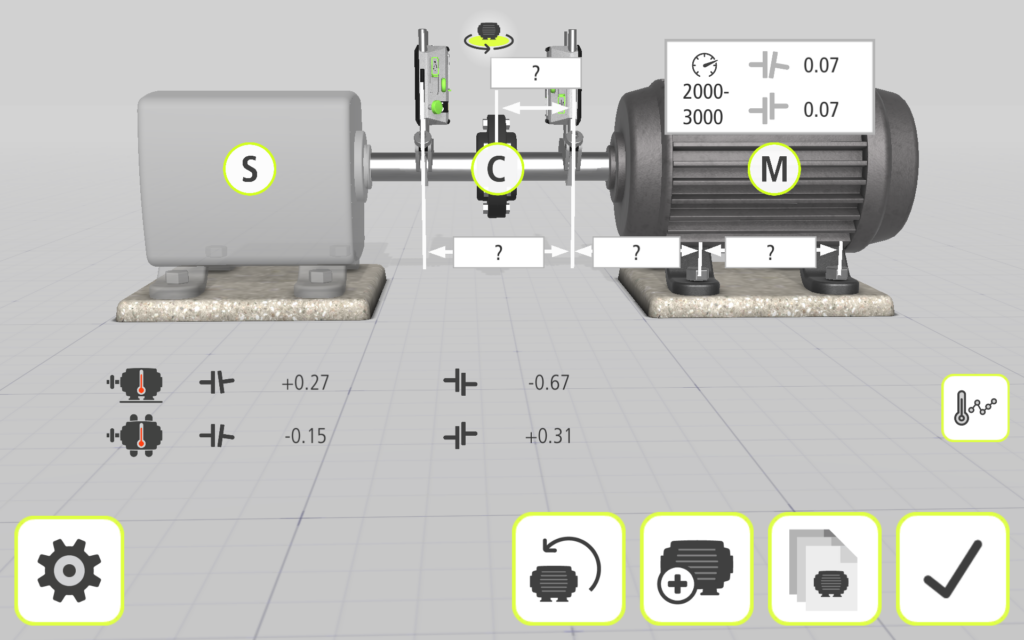
GuideU™ is the next generation of 3D shaft alignment graphical user interface – our patented, customizable, icon-driven and color-coded display system that makes measuring, aligning, and reporting simple. Featuring realistic machine graphics and animated help screens, the risk of human error is minimized to take the guesswork out of shaft alignment.

Cloud Connectivity

Supplied with cloud connectivity, the AT-300 allows users to effortlessly upload alignment reports to Acoem’s proprietary web portal, ensuring seamless data management and easy access to alignment records for analysis and comparison. With just a tap of a button, technicians can send their alignment reports directly to the portal, streamlining their process of documentation.

Lifetime Warranty Benefit

The AT-300 comes with the added assurance of a lifetime warranty, providing customers with unmatched peace of mind and long-term reliability. This commitment to quality reflects Acoem’s confidence in the durability and performance of this cutting-edge alignment system.

Measurement Programs

Measurement Programs

Horizontal Shaft Alignment

Determine and correct the relative position of two horizontally mounted machines that are connected, so that the rotational centers of the shafts are collinear.
Read More

Vertical Shaft Alignment

Determine and correct the relative position of two vertically/flange mounted machines that are connected, such as a motor and a pump, so that the rotational centers of the shafts are collinear.

Read More

SoftCheck™

Check if there is a soft foot condition to verify if the motor is not resting firmly on all its feet.

Read More

Horizontal Shaft Alignment

Determine and correct the relative position of two horizontally mounted machines that are connected, so that the rotational centers of the shafts are collinear.

Vertical Shaft Alignment

Determine and correct the relative position of two vertically/flange mounted machines that are connected, such as a motor and a pump, so that the rotational centers of the shafts are collinear.

target values

Once you have determined the machine’s thermal expansion, this program will allow you to pre-set target values prior to starting your alignment work.

Read More

Spacer Shaft Alignment

For machines driven by spacer shafts, or membrane couplings, this specialized program will guide the user through the entire alignment process. 

Read More

SoftCheck™

Check if there is a soft foot condition to verify if the motor is not resting firmly on all its feet.

target values

Once you have determined the machine’s thermal expansion, this program will allow you to pre-set target values prior to starting your alignment work.

Spacer Shaft Alignment

For machines driven by spacer shafts (or membrane couplings), this specialized program will guide the user through the alignment process.

Measurement Methods

The Dual Multipoint method enables measurement initiation from any position on the rotation, allowing recording of multiple points for optimized calculations. Ideal for uncoupled shafts, non-rotatable shafts, sleeve bearings or journal bearings.

Measurement Methods

The Dual Multipoint method enables measurement initiation from any position on the rotation, allowing recording of multiple points for optimized calculations. Ideal for uncoupled shafts, non-rotatable shafts, sleeve bearings or journal bearings.

Similar to the classic Multipoint method, this measurement method records automated measurements for greater convenience.

In the Tripoint method, the alignment condition can be calculated by recording three points while rotating the shaft at least 60°. In this method, all points are recorded manually by the user.

This method seamlessly incorporates the Tripoint approach, offering the added advantage of fully automated measurements throughout the process.

In the Clock method, machinery positions are calculated by taking three points with 180° of rotation.

Interface Features

The AT-300 interface is designed to make the user experience hassle-free as well as maximize user productivity, facilitate intuitive reporting, and ensure a consistent user experience across all measurements.

Interface Features

The AT-300 interface is designed to make the user experience hassle-free as well as maximize user productivity, facilitate intuitive reporting, and ensure a consistent user experience across all measurements.

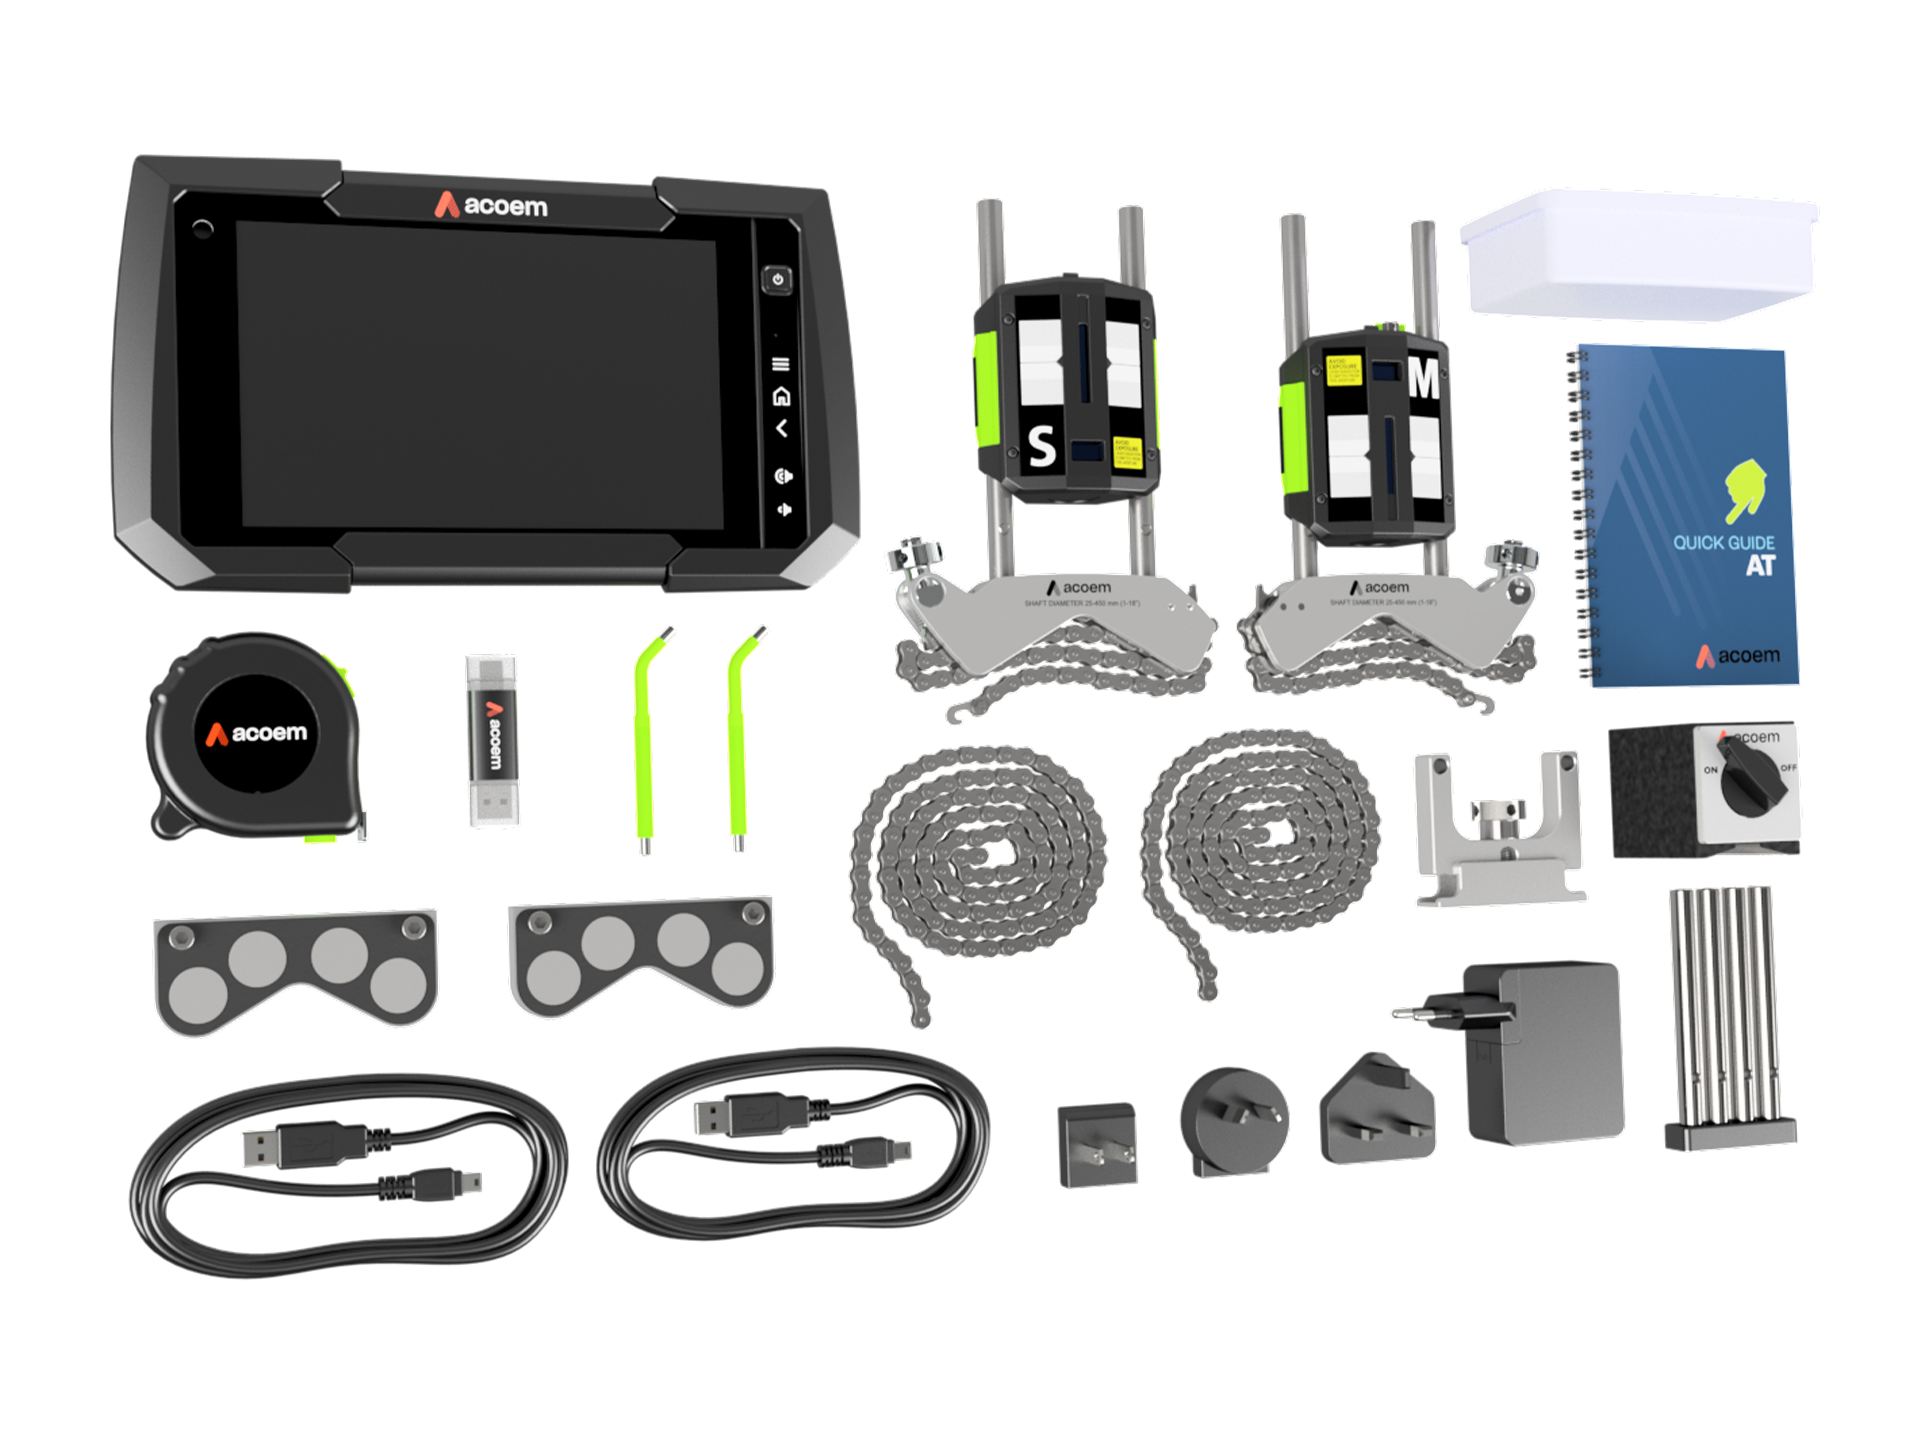
What's Included

Acoem AT Display Unit

Acoem S10 Alignment Sensor

Acoem M10 Alignment Sensor

V-Bracket Complete x2

Quick Guide AT

USB-Cable A-Mini B 2m (6.5 ft)

Chain 8mm (0.3 in) 60 Links 
(L=970mm (38.2 in))

Power Supply 4 USB-Ports 5 VDC

Magnetic V-Brackets x2

Extension Fixture 49mm (1.93 in)

Magnetic Base On-Off

Tape Measure (16.5 in)

Acoem USB

Angled Universal Tool x2

Rod Kit

AT-300 Technical Datasheet

AT-300 Technical Datasheet

M10 & S10 Sensors
Hardware Type
M10 1-1216, S10 1-1217
Physical
Housing Material
Anodized Aluminum frame and high impact ABS plastic overmolded with TPE rubber.
Weight
M10: 7.5 oz (212 g)
S10: 6.6 oz (188 g)
Dimensions
M10: 3.6 in x 3.0 in x 1.3 in (92mm x 77mm x 33mm)
S10: 3.5 in x 3.0 in x 1.3 in (88mm x 77mm x 33mm)
Environment
Operating Temperature
14 to 122 °F (-10 to 50 °C)
Storage Temperature
-4 to 158 °F (-20 to 70 °C)
Long Term Storage Room Temperature
64 to 82 °F (18 to 28 °C)
Battery Charging Temperature
32 to 104 °F (0 to 40 °C)
Relative Humidity
10 – 90 %
Environmental Protection
IP65 (Dust tight and protected against water jets)
Sensing Technology
Laser
650 nm class II diode laser
Laser Power
< 1 mW
Measurement Distance
Up to 49 ft (15m)
Detector
3rd Gen. Digital Sensor
Detector Angular Subtense
30mrad/m (3mm/100mm per meter)
Detector Resolution
1 μm
Measurement Accuracy
0.3% ± 7 μm
Signal Processing
Digital signal processing with sidespot rejection, edge detection, ambient light elimination and anti-vibration mode.
Ambient Light Protection
Optical filtering and ambient light signal rejection
Inclinometer
Dual High Performance MEMS inclinometers
Inclinometer Resolution
0.01 °
Inclinometer Accuracy
±0.2 °
Gyroscope
6-Axis MEMS Inertial Motion Sensor w/ Drift Compensation and Automatic Field Calibration
Gyroscope Accuracy
±1 °
Battery
Type
High Performance Li-ion Rechargeable Battery or External Power
Operating Time
20 Hours Continuous Use (Measuring)
Charging
8 Hours
LED Indicators
Unit State, Laser Transmission and 5 Battery Status Indicators with Instant Battery Check
Communication
Wireless Communication
Bluetooth Low Energy (Bluetooth 5)
Communication Range
33 ft (10m)
Connectors
1 USB Mini Port (IP67)
Acoem Alignment Display Unit
Display
Sunlight Readable, Capacitive Multi-Touch Display, Super-Hardened Gorilla Glass, Rain and Glove Mode
Display Size
8 in
Ruggedness Rating
IP67 (Including Ports), Waterproof and Dust-Tight
Operating Temperature
-4°F to 140°F (-20°C to 60°C)

Downloads

Technical Datasheet

What's in the Case

Want to learn more

about the AT-300?

Enter your contact information below

and we will contact you within

the next 24-48 hours.

"*" indicates required fields

First Name*
Last Name*
/
/
AT-300

Shaft Alignment System

AT-300

Dual Precision at Every Turn

Boost your potential with the Acoem AT-300, featuring precision line laser sensors and an extensive lineup of programs for shaft alignment.

Highlights

Acoem AT-300

The AT-300’s seamless integration of connectivity, mobile devices, and apps empowers maintenance professionals to swiftly respond to machine failures and take corrective actions regardless of their location.

Utilizing the newest and latest CCD technology, the smart sensors deliver superior measurement performance, ensuring precise alignment and optimal operational efficiency. This advanced tool streamlines maintenance processes, minimizing downtime and maximizing productivity. 

Smart Alignment Sensors

Multiple Measurement Methods

With the AT-300, you can measure misalignment with five different measurement methods. Each method includes benefits for different types of machinery.

MULTIPOINT

The Multipoint method enables you to record measurements from multiple points from any position on the rotation.

TRIPOINT

With the Tripoint method, the alignment condition can be calculated by recording three points while rotating the shaft at least 60°.

GuideU™ Interface

GuideU™ is the next generation of 3D shaft alignment graphical user interface – our patented, customizable, icon-driven and color-coded display system that makes measuring, aligning, and reporting simple. Featuring realistic machine graphics and animated help screens, the risk of human error is minimized to take the guesswork out of shaft alignment.

Cloud Connectivity

Supplied with cloud connectivity, the AT-300 allows users to effortlessly upload alignment reports to Acoem’s proprietary web portal, ensuring seamless data management and easy access to alignment records for analysis and comparison. With just a tap of a button, technicians can send their alignment reports directly to the portal, streamlining their process of documentation.

Lifetime Warranty Benefit

The AT-300 comes with the added assurance of a lifetime warranty, providing customers with unmatched peace of mind and long-term reliability. This commitment to quality reflects Acoem’s confidence in the durability and performance of this cutting-edge alignment system.

Features

Measurement Programs

Measurement Programs

Horizontal Shaft Alignment

Determine and correct the relative position of two horizontally mounted machines that are connected, so that the rotational centers of the shafts are collinear.
Read More

Vertical Shaft Alignment

Determine and correct the relative position of two vertically/flange mounted machines that are connected, such as a motor and a pump, so that the rotational centers of the shafts are collinear.

Read More

SoftCheck™

Check if there is a soft foot condition to verify if the motor is not resting firmly on all its feet.

Read More

Horizontal Shaft Alignment

Determine and correct the relative position of two horizontally mounted machines that are connected, so that the rotational centers of the shafts are collinear.

Vertical Shaft Alignment

Determine and correct the relative position of two vertically/flange mounted machines that are connected, such as a motor and a pump, so that the rotational centers of the shafts are collinear.

target values

Once you have determined the machine’s thermal expansion, this program will allow you to pre-set target values prior to starting your alignment work.

Read More

Spacer Shaft Alignment

For machines driven by spacer shafts, or membrane couplings, this specialized program will guide the user through the entire alignment process. 

Read More

SoftCheck™

Check if there is a soft foot condition to verify if the motor is not resting firmly on all its feet.

target values

Once you have determined the machine’s thermal expansion, this program will allow you to pre-set target values prior to starting your alignment work.

Spacer Shaft Alignment

For machines driven by spacer shafts (or membrane couplings), this specialized program will guide the user through the alignment process.

Measurement Methods

The Dual Multipoint method enables measurement initiation from any position on the rotation, allowing recording of multiple points for optimized calculations. Ideal for uncoupled shafts, non-rotatable shafts, sleeve bearings or journal bearings.

Measurement Methods

The Dual Multipoint method enables measurement initiation from any position on the rotation, allowing recording of multiple points for optimized calculations. Ideal for uncoupled shafts, non-rotatable shafts, sleeve bearings or journal bearings.

Similar to the classic Multipoint method, this measurement method records automated measurements for greater convenience.

In the Tripoint method, the alignment condition can be calculated by recording three points while rotating the shaft at least 60°. In this method, all points are recorded manually by the user.

This method seamlessly incorporates the Tripoint approach, offering the added advantage of fully automated measurements throughout the process.

In the Clock method, machinery positions are calculated by taking three points with 180° of rotation.

Interface Features

The AT-300 interface is designed to make the user experience hassle-free as well as maximize user productivity, facilitate intuitive reporting, and ensure a consistent user experience across all measurements.

Interface Features

The AT-300 interface is designed to make the user experience hassle-free as well as maximize user productivity, facilitate intuitive reporting, and ensure a consistent user experience across all measurements.

What's Included

What's Included

Acoem AT Display Unit

Acoem S10 Alignment Sensor

Acoem M10 Alignment Sensor

V-Bracket Complete x2

Quick Guide AT

USB-Cable A-Mini B 2m (6.5 ft)

Chain 8mm (0.3 in) 60 Links 
(L=970mm (38.2 in))

Power Supply 4 USB-Ports 5 VDC

Magnetic V-Brackets x2

Extension Fixture 49mm (1.93 in)

Magnetic Base On-Off

Tape Measure (16.5 in)

Acoem USB

Angled Universal Tool x2

Rod Kit

Specs

AT-300 Technical Datasheet

AT-300 Technical Datasheet

M10 & S10 Sensors
Hardware Type
M10 1-1216, S10 1-1217
Physical
Housing Material
Anodized Aluminum frame and high impact ABS plastic overmolded with TPE rubber.
Weight
M10: 7.5 oz (212 g)
S10: 6.6 oz (188 g)
Dimensions
M10: 3.6 in x 3.0 in x 1.3 in (92mm x 77mm x 33mm)
S10: 3.5 in x 3.0 in x 1.3 in (88mm x 77mm x 33mm)
Environment
Operating Temperature
14 to 122 °F (-10 to 50 °C)
Storage Temperature
-4 to 158 °F (-20 to 70 °C)
Long Term Storage Room Temperature
64 to 82 °F (18 to 28 °C)
Battery Charging Temperature
32 to 104 °F (0 to 40 °C)
Relative Humidity
10 – 90 %
Environmental Protection
IP65 (Dust tight and protected against water jets)
Sensing Technology
Laser
650 nm class II diode laser
Laser Power
< 1 mW
Measurement Distance
Up to 49 ft (15m)
Detector
3rd Gen. Digital Sensor
Detector Angular Subtense
30mrad/m (3mm/100mm per meter)
Detector Resolution
1 μm
Measurement Accuracy
0.3% ± 7 μm
Signal Processing
Digital signal processing with sidespot rejection, edge detection, ambient light elimination and anti-vibration mode.
Ambient Light Protection
Optical filtering and ambient light signal rejection
Inclinometer
Dual High Performance MEMS inclinometers
Inclinometer Resolution
0.01 °
Inclinometer Accuracy
±0.2 °
Gyroscope
6-Axis MEMS Inertial Motion Sensor w/ Drift Compensation and Automatic Field Calibration
Gyroscope Accuracy
±1 °
Battery
Type
High Performance Li-ion Rechargeable Battery or External Power
Operating Time
20 Hours Continuous Use (Measuring)
Charging
8 Hours
LED Indicators
Unit State, Laser Transmission and 5 Battery Status Indicators with Instant Battery Check
Communication
Wireless Communication
Bluetooth Low Energy (Bluetooth 5)
Communication Range
33 ft (10m)
Connectors
1 USB Mini Port (IP67)
Acoem Alignment Display Unit
Display
Sunlight Readable, Capacitive Multi-Touch Display, Super-Hardened Gorilla Glass, Rain and Glove Mode
Display Size
8 in
Ruggedness Rating
IP67 (Including Ports), Waterproof and Dust-Tight
Operating Temperature
-4°F to 140°F (-20°C to 60°C)
Resources

Downloads

Technical Datasheet

What's in the Case

Want to learn more

about AT-300?

Enter your contact information below and we will contact you within the next 24-48 hours.

"*" indicates required fields

First Name*
Last Name*