Gearboxes are used in numerous applications, including machine tools, industrial equipment, conveyor belt drives, and just about any power transmission application with rotary motion that requires a change in torque and/or speed.
Output speed and torque are always going to be in contrast to each other – if you use a gearbox to increase the output speed of the driver the output torque is decreased. Conversely, if you use a gearbox to decrease the output speed the output torque is increased.
Understanding Vibration Sources in Gearboxes
Gearboxes are one of the more challenging pieces of equipment for the vibration analyst, as there are a considerable number of vibration sources, so there can be many different frequencies represented on the vibration spectrum. By identifying and analyzing these frequencies we can consistently determine the condition or cause of failure through routine vibration analysis.
A gearbox is typically included in the overall equipment design (a machine train) as follows:
- Driver (motor, turbine)
- Coupling/Sprocket/Belt
- Gearbox
- Coupling/Sprocket/Belt
- Driven Machine
Note that there are typically two couplings on most installations, so gearboxes are highly subject to issues relating to alignment as well as belt/chain tension.
Essential Machine Information for Gearbox Vibration Analysis
When analyzing gearbox vibration data, it is important to get all applicable machine information, such as tooth count and configurations, bearing IDs, and gearbox ratio/speeds. The ratio is often the easiest to find as it is on the gearbox data tag. Bearing ID, tooth counts and configurations are available from the OEM, machine sketch, or gearbox repair shop. It is worth the effort to get all this information into your vibration database properly as it will help you with your analysis and data collection setups.
Creating a Gearbox Sketch
Once you have all the necessary information it is best to sketch the gearbox and use the information to calculate all the shaft speeds and gear mesh frequencies you will expect to see on the spectrum.
A gearbox sketch should look similar to this.
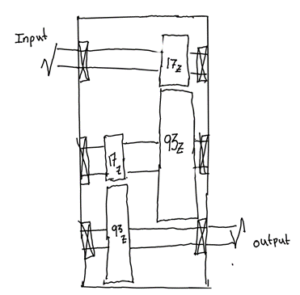
Using the sketch, we can easily break down our machine speeds and gear mesh frequencies (GMF).
Analyzing Gear Mesh Frequencies (GMFs)
Beginning at the input shaft, we will assume for this example, we have a 4-pole induction motor that operates at about 1800 RPM, the gearbox shaft that is directly attached to this motor has a pinion with 17 teeth that runs in contact with a gear with 93 teeth. As the shaft rotates there will be a vibration each time one of the 17 teeth comes in contact with another tooth – so the gear mesh frequency on this shaft will be approximately:
17 (# of Teeth) x 1800 (RPM) = 30,600cpm (Gear Mesh Frequency Input Shaft)
To calculate the GMF for the intermediate shaft, we will need to know the speed of the intermediate shaft. This is calculated by using the ratio of the input pinion to the intermediate gear and then multiplying it by the input RPM.
17 (Input Pinion) / 93 (Intermediate Gear) = 0.18279 (Ratio)
0.18279 (Ratio) x 1800 (Input RPM) = 329.03 (Intermediate Shaft RPM)
17 (# of Teeth Intermediate Pinion) x 329.03 (Intermediate Shaft RPM) = 5,593.54 (Intermediate Shaft GMF)
Calculating the output shaft RPM, find the ratio, and multiply it by the intermediate shaft RPM.
17 (Intermediate Gear Teeth) / 93 (Output Gear Teeth) = 0.18279 (Ratio)
0.18279 (Ratio) x 329.03 (Intermediate Shaft RPM) = 60.14 (Output Shaft RPM)
In this gearbox example, there are 2 meshing gear sets and therefore you will see two gear mesh frequencies as we had calculated above.
30,600 GMF on the input shaft to the intermediate shaft
5,593 GMF on the intermediate shaft to the output shaft
Simplifying Gear Mesh Analysis with Proper Setup
In analyzing gearboxes, it is recommended to capture a high-resolution reading at 3.25 x GMF. The purpose of this is to simplify analysis by capturing the gear mesh activity in a consistent manner that will aid in the pattern recognition used in our analysis.
I included a couple of examples below demonstrating the purpose of this type of reading setup.
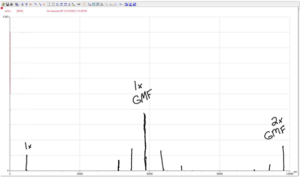
Here you can see a spectrum where we captured the 1x GMF and 2x GMF, but we can only see ½ of the sidebands relating to the 2x GMF and 3x GMF is not visible due to a lack of bandwidth. This would make it difficult to identify some of the issues relating to 3x GMF such as worn teeth. In this instance, I would want my bandwidth to include the 3x as well as any sidebands relating to it which would have been shown if the spectrum were created to be at 3.25x GMF.
Another good reason for creating an additional reading for gear mesh is the fact that the spectrum can get crowded and difficult to analyze when we are not focusing on each component. The example below shows a gearbox with 2 GMF’s resulting in a significant number of “peaks” in the spectrum that are not as quickly identifiable as they would be with the proper setup.
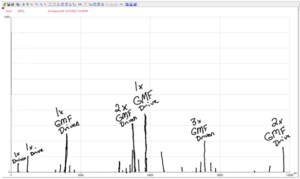
Here you can see there are 2 sets of GMF and it’s difficult to see which is which. If we were to change the bandwidth as in the example below you can see the pattern and it becomes much easier to determine the issues (if any) from the gear mesh.
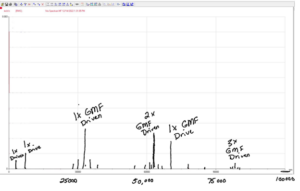
We still see the 1x GMF from the drive pinion, but the 2x and its related sidebands are beyond the bandwidth of the spectrum creating a “clearer” picture of the 1x, 2x, and 3x gear mesh frequencies – ultimately making it easier to diagnose quickly with the vibration charts and examples that are shared across the entire knowledge base as a whole. This is a standard used for gearbox readings and most skilled analysts follow this standard in setting up data collection for gearboxes.
Going back to our example with GMF’s of 30,600 on the input pinion and 5593 on the output we would set up our readings as follows:
30,600 x 3.25 = 99,531 Bandwidth on the input and intermediate sides
5,593 x 3.25 = 18,177 Bandwidth on the intermediate and output sides
These readings are approximations and depending on the analysis software you are using, just get as close as you can. It will make it easier to analyze.
Common Gearbox Problems
Typical common problems we see on gearboxes include:
- Misalignment (Gearbox)
- Misalignment (Gearsets)
- Worn Teeth
- Cracked or Broken Teeth
- Improper Backlash
- Bearing Faults
- Looseness
- Gear Phase Assembly
- Hunting Tooth
A misaligned gearbox will present itself on the spectrum in the same way misalignment is seen on any other piece of “coupled” equipment. You will have a high vibration at 2x running speed when you have high offset misalignment. The equipment will be 180 degrees out of phase in the radial direction as well. With angular misalignment, you will also get a high 1x and 2x vibration except it will be dominant in the axial position with the 180-degree phase shift being in the axial direction as well.
Precision alignment of a gearbox requires that both the input and output gearbox shafts be aligned to the other components of the machine train (driver & driven machines).
Misaligned gearsets are identified by looking at the gear mesh frequencies, primarily the 1x GMF and 2x GMF – in the event that you have this condition the 2x GMF will be at a higher amplitude than the 1x GMF. This can occur due to bearing wear or failure, make sure to double-check the spectrum for any bearing faults or internal looseness prior to assigning a priority for repair as a failing bearing in a gearset will not last as long as misaligned teeth in a gearset will and you will need to repair it sooner.
Worn teeth will present on the spectrum as a high 1x GMF, and as a high 3x GMF with high amplitude sidebands with numerous harmonics of those sidebands. This looks similar to a gearset with an improper backlash setting with the differentiator being the 3x GMF. You can typically monitor a gearbox with this condition and easily determine the priority of repair by watching the change in amplitude month to month. Note that this can also be caused by looseness in the bearings so remember to double-check the spectrum for that fault.
Cracked or broken teeth are usually diagnosed using the time waveform as the vibration impact will occur at 1x the shaft RPM it can be difficult to differentiate this from the many other issues that present at that frequency. By viewing the time waveform, you will be able to see the impact as it will typically dominate the waveform, although viewing data in the time waveform can be daunting worn teeth are usually pretty simple to identify as long as you have the proper setup on the waveform.
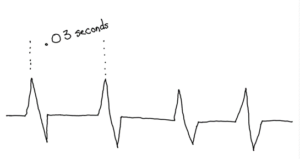
Here is an example of what a time waveform will look like in the instance you have a cracked tooth on the gearbox from our example above. The time in between impacts has been identified as .03 seconds. In order to convert that to frequency you simply need to invert it, the formula being….
1/.033333 = 30hz
Change Hz to CPM by multiplying by 60.
30 x 60 = 1800 (Input shaft RPM)
In this instance, you can see there is significant impacting occurring 1x the revolution of the shaft and it is likely due to a cracked or broken tooth in the gearbox.
Improper backlash is an issue that will show up on the spectrum as significant side banding around the gear mesh frequencies of the shaft with the issue. The sidebands will sometimes be higher than the gear mesh itself if this fault is bad. The only difference between this and worn teeth will be the 3x GMF will be at a lower amplitude. Again, check the spectrum for bearing wear or looseness as those faults can also present in an equivalent way in the spectrum.
Bearing faults in gearboxes will show in the same way they do in any other machine component; the challenge is that there are many additional frequencies that will show up in a gearbox, so it is especially important to identify each one to ensure that you are not missing a bearing fault frequency in the spectrum. The high amplitude vibration coming from the gear mesh frequencies will also cause the spectrum to auto-scale and can hide bearing fault frequencies as they will appear at a much lower amplitude than other forcing functions present in the gearbox.
Looseness, specifically bearing looseness will show up as multiple harmonics of running speed with a raised noise floor. Again, the vibration may be difficult to see in the spectrum and you may need a special reading set up to provide you with a bandwidth that does not include the vibration from GMF or other higher frequency vibrations allowing you to focus on around 12-15 harmonics of running speed making it easier to identify.
Gear phase assembly and hunting tooth are rare to find in gearboxes, the OEM gearbox manufacturer engineers will calculate these frequencies and design their gearboxes to not have either one of these issues. By calculating the prime numbers for each contacting gearset and dividing them you will be able to determine how often each tooth contacts the same tooth. If this happens too often in a gearbox you will get high wear and high vibration on your gearbox that will result in a significantly decreased life expectancy.
There may be other issues you find on gearboxes, but these are the most common.
Gearbox Monitoring Strategy: Tailoring to Equipment Type
Analyzing a gearbox can be complicated so remember to follow these recommendations when setting up a program where you will be monitoring this equipment type:
- Create additional readings for each gear set that will show your gear mesh frequency x 3.25.
- Have a reading showing 12-15 harmonics of running speed (RPM x 12 = bandwidth).
- Include a time waveform showing at least 10 revolutions of the shaft (1/(RPM/60) = Time.
- Use trends to identify change and waterfall plots to identify where the change occurred.
Many issues can show as a symptom of a bearing fault or bearing looseness and it needs to be determined which is the actual cause.
Gearboxes are typically sent in for repair rather than repaired in the field, so it is OK to be general in reporting as long as you are sure the issue lies in the gearbox. Nobody is going to rebuild a gearbox without checking for proper alignment, wear, backlash, and bearing condition.
Now, get out there and identify those defective gearboxes!



1 Comment
Good document