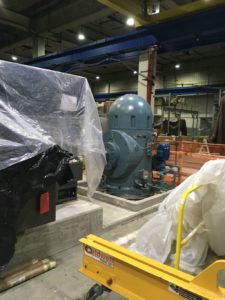
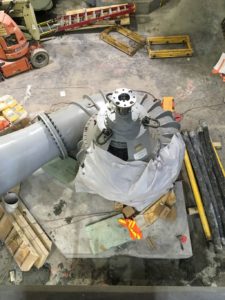
Recently, VibrAlign was called to consult with a customer to recommend a procedure and alignment tools for a very long-distance vertical pump alignment. First, we will describe the machine and then how we aligned it. This large raw sewage pump machine train begins at the driver level. In this plant, floor levels are described by relationship to sea level. At the top level (+35), the primary mover, a 2000HP horizontal electric motor is coupled to a right-angle gear reducer.

From there, the gear reducer is coupled by spacer shaft to floor bearing 1 (level +15), which is coupled by spacer shaft to floor bearing 2 (level 0), which is coupled by spacer shaft to the pump (level -35).

An astute blog reader might already be wondering, would this be considered a vertical machine train? Ah, not so fast. In the sense that there are multiple rotating elements coupled together, one could call it a machine train; however as is often the case, the pump is quite fixed. The engineering specifications and installation instructions call for setting the pump, then aligning floor bearing 2 (level 0) to pump, and then proceeding up the line to the next floor bearing and finally to the gear reducer.
Ultimately, this is exactly what the customer did. Since this is new construction, we first recommended a rough alignment of the gear reducer to the pump shaft. Prior to our arrival onsite, the pump had been set, and gear reducer soleplate roughed in using mechanical methods (levels and plumbs). The reason for recommending the additional rough check using the laser is to make darn sure the gear reducer would be in an “alignable position”. In other words, to minimize the required adjustments to avoid getting bolt-bound (base-bound is not an issue for a flange mounted machine). Essentially, we wanted to be confident the gear reducer was set properly before installing and aligning the floor bearings and shafting.
For further detailed information about the coning process described below please refer to blog article here: https://acoem.us/shaft-alignment/setting-ol2r-offline-running-offset-cardan-brackets/
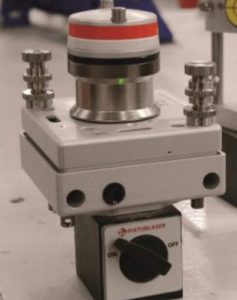
For a rough alignment of this distance (~70 feet), the coning method offers an easy and fast process that is very accurate over such a distance. Tools used for this job included a T21 transmitter from a Fixturlaser NXA Ultimate kit, pencil and graph paper, and two-way radios.

Radio contact was required to communicate between the laser operator and graph paper operator. The T21 transmitter is used with the prism removed from the turret, which gives a straight-line laser emitted perpendicular to its base.
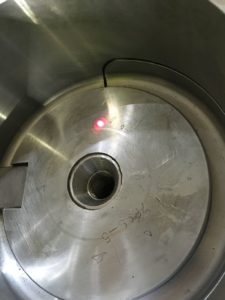
The process begins by mounting the laser to the gear reducer shaft end. In this case we mounted the back of the mag base to the inside of the coupling hub, which puts the transmitter near shaft centerline. However, with coning it is not necessary to locate the transmitter exactly at shaft center. Next the coning process is used to project the gear reducer centerline on the pump shaft end. Again, this required radio instructions from pump end to the gear reducer level to instruct the millwright how to adjust the laser after it is marked initially on paper then rotated 180deg. As usual, it took 2-3 gradually finer adjustments to focus the dot to point that does not move as the gear reducer is rotated. Now we have a visual reference of the gear reducer center of rotation projected onto the pump shaft end (see picture).

This part of the process is used to adjust angularity. So, the next step was to adjust the angle north/south, then east/west to move that dot on the pump shaft end to the center of the pump shaft.
With this step completed, we have removed the angularity and are left with parallel shafts that may or may not have some offset. Next, we measure and adjust the offset.
In order to see and adjust the offset, we reverse the setup and place the T21 transmitter on the pump shaft end. Once the laser is coned (using the same coning process), the dot now represents the pump center of rotation projected on the gear reducer shaft end. This part of the process is used to adjust offset. The gear reducer is moved north/south and east/west until the dot aligns precisely to the center of gear reducer shaft.
There are several keys to understanding how this process works and can work for you under similar circumstances. First, the coning itself can be thought of as a way to project a rotational centerline at some distance. As the distance changes, so does the cone – for example if we wanted to rough in each of the floor bearing soleplates, we would have needed to re-cone for the shorter distance. Second, the order of operations for adjusting angularity and offset matters. The rule I was taught is “offset near/angle far”. In other words, use the dot projected far (gear reducer to pump) for angularity; and the dot projected near (from pump to gear reducer) for offset. (Near and Far here describe where the dot is in relation to the moveable machine)
Finally, I will share some related thoughts from this job. The millwright team had done an excellent job roughing things in with traditional mechanical methods. However, I think they will agree their new-found skill may replace these methods in the future due to increased speed and ease (there are 6 more of these pumps on the overall job spanning the next 2 years). Because everything was roughed in with precision, there were no surprises and the subsequent alignments (pump to floor bearing 2, floor bearing 2 to floor bearing 1, and floor bearing 1 to gear reducer) were all completed quickly and within tolerance. If you are wondering could the alignment be measured from the coning process – YES! With the RM detector from the same kit, the coning could have been completed right down to 0, and then actually measured to confirm when you get to true center. In this case, with the distances involved being so long, the visual measurement and positioning was quite sufficient. Additional opportunities were discovered for this customer to utilize the T21 transmitter and level application during initial setting of soleplates and pump bases. All in all, a very productive visit!


2 Comments
I was there for the final stage of alignment. We measured the rough alignment after coning. The process had achieved almost a precision alignment. The readings for offset at each point were within 25 mils, with almost zero angularity.
Nice job Steve. From that point, It took about 2 hours to complete a precision alignment over 70’ with multiple bearing points. Pretty awesome.
Very, very good demonstration.